Before starting the configuration, ensure that your organization has an active M365 subscription and that you have Microsoft 365 admin privileges.
Setting Up the Reporting Mailbox
The first thing to create is a dedicated reporting mailbox to collect all phishing reports. This mailbox will be used when integrating Microsoft's Report Phishing Add-in in steps 5 and 6.
Step 1. Create a New Contact
Access the Exchange Admin Center (EAC) using the provided link or by selecting 'Exchange' in the Microsoft 365 admin sidebar, then follow these steps to create a new contact:
- Navigate to Recipients > Contacts.
- Click on + Add a mail contact.
- Fill in the new contact form with the following details:
- First Name: Phishing
- Last Name: Report
- Display Name: Symbol Security (or your preferred name)
- Alias: Phishing
- External Email Address: suspect@report.symbolsecurity.com
- Click on Next > Create > Done.
Step 2: Create a Shared Mailbox. (Optional)
Follow these steps to create a new shared mailbox from the Exchange Admin Center (EAC). Please note that shared mailboxes require a license.This step is Optional if a shared mailbox is already established for report collection.
- Navigate to Recipients > Mailboxes.
- Click on + Add a shared mailbox.
- Fill in the mailbox form with the following information:
- Display Name: PhishReport
- Email Address: PhishReport
- Domain: Use the Select Domain drop-down to choose your organization's domain.
- Click on Create.
Step 3: Set Up Forwarding on the Shared Mailbox
Now that you’ve configured both a Contact and a Shared Mailbox, proceed to set up email forwarding to automatically route messages from the Shared Mailbox to the Contact.
- Navigate to Recipients > Mailboxes and select the shared mailbox you just created or the one you want to use for email reporting.
- When the side panel opens, click on the Email Forwarding action.
- Enable the "Forward all emails sent to this mailbox" option.
- Under "Forward to an internal email address", click on Search Email and select the Symbol Security contact you just previously created: suspect@report.symbolsecurity.com.
- (Optional) To keep a copy of forwarded emails in the shared mailbox, enable the "Deliver messages to both forwarding address and mailbox" option.
- Click on Save.
And that's it! By completing the previous steps, the Report Mailbox will be functional. Employees can now report phishing emails by forwarding them to the defined Mailbox, and they will be directly recorded in the Reported Phishing list within the Symbol Security app..
However, this is just a part of the equation. If you want to enable the native Microsoft Report Phishing button, follow these steps:
Enabling Microsoft's Report Phishing Button
Microsoft provides two ways for users to report phishing emails within the Report Phishing button, depending on your organization's setup:
-
Report Phishing Add-in for Outlook – Allows users to report suspicious emails directly from Outlook (desktop, web, or mobile).
-
Microsoft Defender Reporting Button – Integrates phishing reporting into Microsoft Defender for Office 365, providing security teams with enhanced visibility.
This article guides you through enabling either the Outlook add-in or Defender-based reporting, depending on your organization's needs.
✉️ Report Phishing Add-in for Outlook
Here are some step-by-step instructions of how to configure the M365 'Report Phishing' add-in for Outlook and Outlook on the web.
1. Getting the 'Report Phishing' Add-in
Before installing the Report Phishing add-in, make sure your organization has already accepted Microsoft's terms of use, then follow these steps:
- Go to Microsoft AppSource and search for Report Phishing.
- Click Get it now and follow the instructions to complete the installation.
📌 Note: It may take up to 48 hours for the add-in to appear in your organization. Once available, you can configure it to integrate with your security awareness platform.

2. Integrating Report Phishing Add-in with Symbol Security
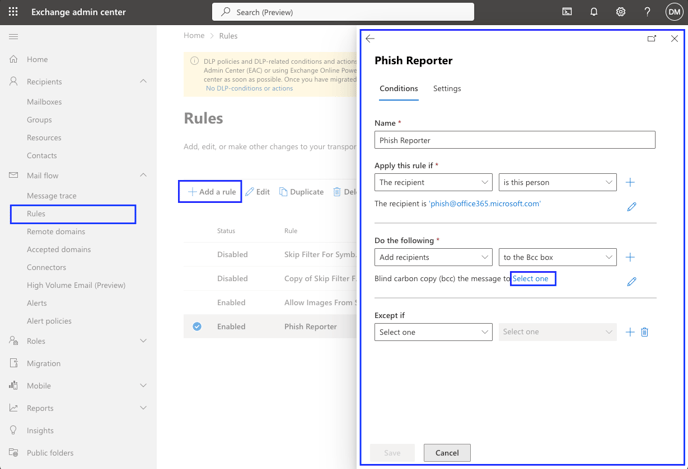
From the Microsoft 365 app, navigate to the Exchange Admin Center (EAC) and follow these steps to set up a mail flow rule:
- Navigate to Mail Flow from the left sidebar and click on Rules.
- Click on Add a Rule and Create a new rule.
- When the New Rule window appears, enter a Name for the rule, e.g, Report Phishing.
- From the "Apply this rule if" condition, set it to:
- The recipient is → phish@office365.microsoft.com
- From the "Do the following" condition, set it to:
- Bcc the message to → suspect@report.symbolsecurity.com AND your organization's reporting mailbox.
- Click on Save.
Following the previous steps, all emails reported using the Report Phishing button will be forwarded to your internal reporting mailbox and the Symbol Security App. Keep in mind that it may take up to 48 hours for the add-in to appear in your organization.
🛡️ Microsoft Defender Reporting Button
If your organization is using Microsoft Defender, follow these steps to configure the Microsoft's Reporting button for your users and auto-forward reported emails directly to Symbol Security instead of Microsoft.
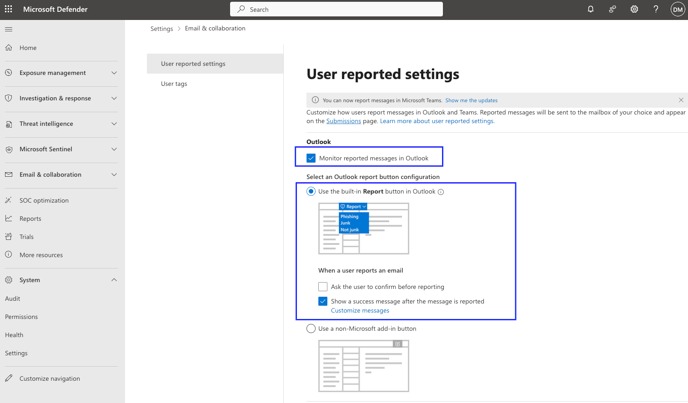
- Access the Microsoft 365 Defender portal and navigate to the Security Settings by following the previous link or accessing Settings > Email Collaboration > User Reported Settings.
- Check the "Monitor reported messages in Outlook" option.
- From the Outlook report button configuration, select the option: "Use the built-in Report button in Outlook".
- Enable the "Show success message" option if you want to display a message after any email is reported, and feel free to customize the message as you want.
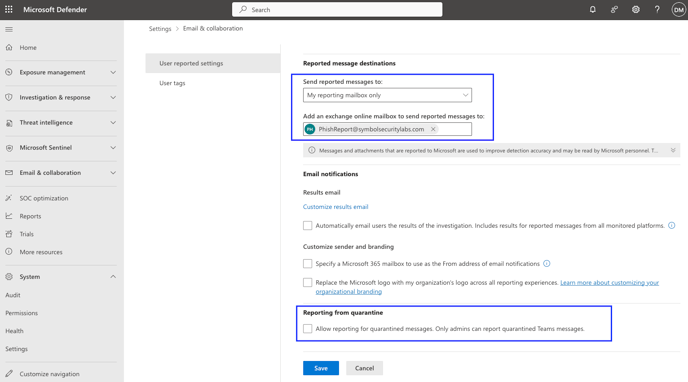
- From the "Reported message destinations" section:
- Select the option "My reporting mailbox only".
- Add into the email address field the Shared Mailbox previously created or the one you want to use for email reporting.
- Scroll down and toggle OFF Reporting from Quarantine.
- Click on Save.